
How to Switch to Google Analytics 4: Three Simple Steps
(This post contains affiliate links. Read my full disclosure.)
Google Analytics has been offering Google Analytics 4 since October 2020, but much of the advice was to wait to implement GA4 and stick with Universal Analytics for as long as possible. In March 2022, Google issued an end-date for Universal Analytics: July 1, 2023.
Google Analytics as we know it is going away on July 1, 2023.
But don’t panic.
If you started using GA4 when the end-date was announced, you’ll have a year’s worth of historical data available in GA4 when Universal Analytics are retired.
Right now, all you need to do is the basics: set up Google Analytics 4, connect it to your Universal Analytics Property, and get GA4 running alongside the Universal Analytics on your site.
Below you’ll find directions for getting started with GA4 so that you can track both Universal Analytics and GA4 concurrently.
Stay tuned to WordPress and plugin news so that you’ll be aware of changes to the configuration of any plugins you’re using in conjunction with Google Analytics.
Newflash: While Universal Analytics will stop collecting data on July 1, 2023, Google has announced that we’ll have access to the historical data through July 1, 2024. This is good news–it means we have time to download any historical reports.
Please Note: The steps below outline the basics for a default Google Analytics setup. If your Google Analytics account is linked to other Google products, you will need to research additional configuration options.
1. Set Up Google Analytics 4 Property
While you can simply click on the “Let’s Go” button in the message at the top of your Google Analytics–or choose the GA4 Setup Assistant option in your GA Property Settings–following the steps below will allow you to double check that your website property settings are correct before you create an non-editable Data Stream.
- Navigate to https://analytics.google.com/ and be sure you’re seeing the Analytics account you want to work with.
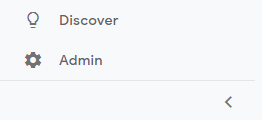
- Click the Admin gear icon in the bottom left of your Google Analytics.
- Click the Create Property button.

- Type your property name, i.e. “Site Name – GA4”.
- Select your time zone and currency.
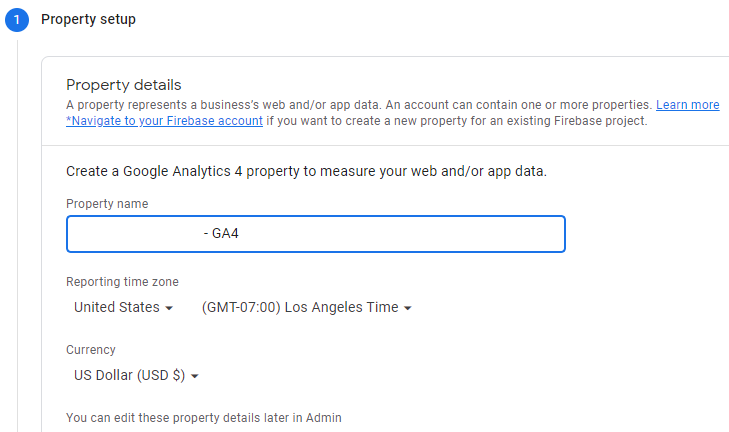
- Click the Next button.
- Select your industry category, business size, and GA usage.
- Click the Create button.
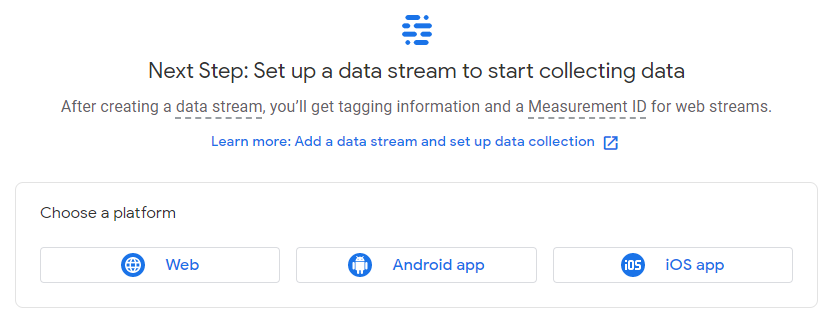
- Choose a platform (unless your website also has its own app, you’ll likely just need to choose Web).
- Enter your exact Website URL (this can’t be changed!) and Stream Name (i.e. website name). Be sure to include a www if your website uses www.
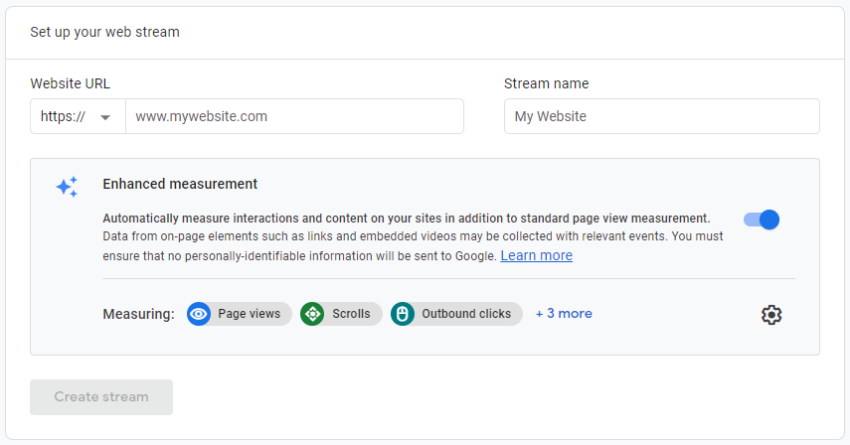
- Click the Create Stream button.
- Copy the Measurement ID to use for step 2 below. (Measurement ID starts with G- and is followed by letters and numbers.)
2. Connect Google Analytics Universal Property to GA4 Property
- Click the Admin gear icon again (in the bottom left of your Google Analytics).

- Switch back to the Universal Analytics Property you want to work with.
- Click the GA4 Setup Assistant.
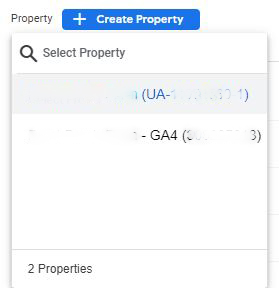
- In the “I want to connect to an existing Google Analytics 4 property” section, choose your newly created GA4 property from the drop-down.
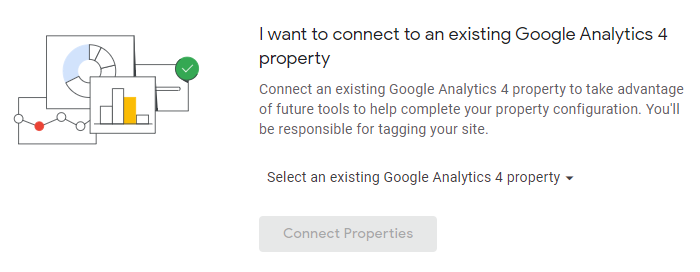
- Click the Connect Properties button.
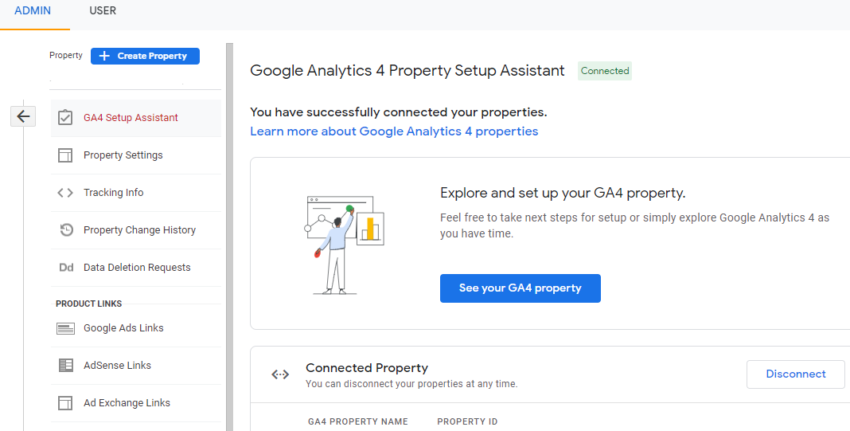
- You should now see the message “You have successfully connected your properties.” followed by your GA4 property name and property ID (this is different than the Measurement ID!).
- If you’re still seeing the message “Prepare now by setting up and switching over to a Google Analytics 4 property.” at the top of your Google Analytics, you can click the Dismiss button.
3. Add Google Analytics 4 Tag to Website
If you’re using a plugin like Monster Insights or ExactMetrics to insert your Google Analytics code to your website, this process will be as easy as copy, paste, and save!
How to Add GA4 Measurement ID (and Protocol API) to MonsterInsights Settings
The MonsterInsights plugin makes it easy to begin tracking GA4 alongside Universal Analytics.
- Navigate to your WordPress dashboard.
- Go to Insights, Setting.
- Paste your GA4 Measurement ID in the Dual Tracking Profile field.
- (Optional) Paste your Measurement Protocol API secret value into the Measurement Protocol API Secret field.
- Click Save Changes.
How to Add GA4 Measurement ID (and Protocol API) to ExactMetrics Settings
The ExactMetrics plugin makes it easy to begin tracking GA4 alongside Universal Analytics.
- Navigate to your WordPress dashboard.
- Go to ExactMetrics, Settings.
- Paste your GA4 Measurement ID in the Dual Tracking Profile field.
- (Optional) Paste your Measurement Protocol API secret value into the Measurement Protocol API Secret field.
- Click Save Changes.
How to Add GA4 Measurement ID to Your WordPress Website
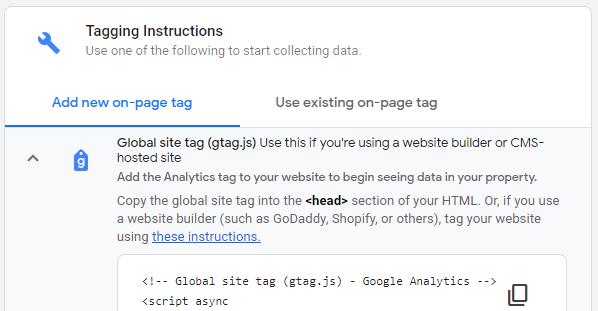
If you’re not using a plugin like Monster Insights or ExactMetrics to insert Google Analytics code on your website, you’ll need to paste your Global Site Tag alongside your Universal Analytics Code. (Check the tutorial from iMark Interactive for suggestions on where to find the code on your site.)
- Click the Admin gear icon again (in the bottom left of your Google Analytics).
- Switch to the GA4 Property you want to work with.
- Click Data Streams.
- Click your website’s Data Stream.
- Click the Global Site Tag option.
- Copy the Global Site Tag.
- Paste this code into your Header Script Settings or wherever your Universal Analytics Code is installed.
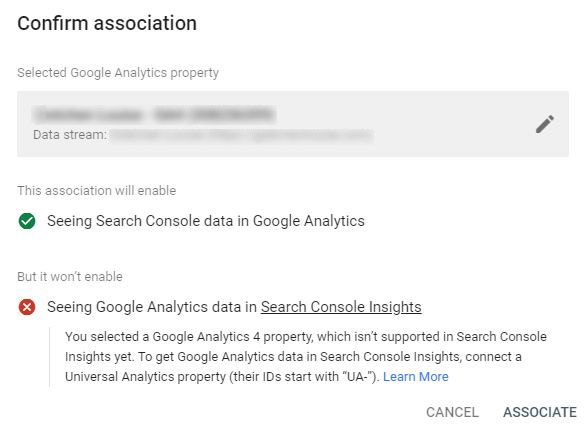
Optional: Link GA4 Web Stream to Search Console Property
Associating a Google Analytics 4 Property with Google Search Console allows you to see Search Console Data in Google Analytics 4. Google Search Console does not yet support Google Analytics 4 data (see screenshot below).
Here is how to initiate the association of Google Analytics 4 and Google Search Console from Google Analytics Property Settings.
- Click the Admin gear icon (in the bottom left of your Google Analytics).
- Switch to the GA4 Property you want to work with.
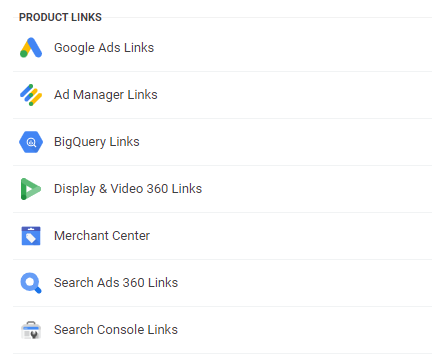
- Click Search Console Links in the bottom of the Property column (under Product Links).
- Click the blue Link button.
- Click Choose Accounts.
- Search for and select the corresponding property.
- Click Confirm.
- Click Next.
- Click Select and choose your data stream.
- Click Next.
- Confirm that matching Search Console Properties and Web Streams are selected.
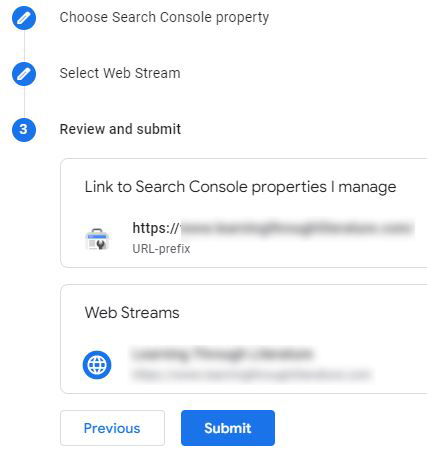
- Click Submit.
- You should see a Results screen with a green “Link Created” notice.
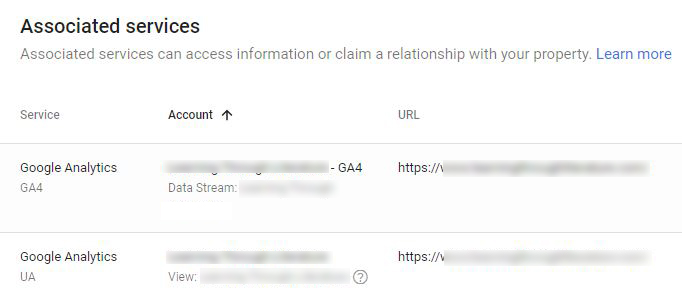
- You can now navigate to Google Search Console, Settings, Associations, and see both versions of Google Analytics in Associated Services.
Optional: Create a Measurement Protocol API Secret
If you’re using a plugin like MonsterInsights or Exact Metrics, it’s easy to create and add a Measurement Protocol API in order for GA4 to track eCommerce events (add to cart, checkout, etc.) and form submissions. (Find more specifics in directions from MonsterInsights and directions from ExactMetrics.)
- Navigate to Google Analytics.
- Select the GA4 Property you want to work with.
- Click Data Streams.
- Click the arrow next to your stream.
- Scroll down to “Measurement Protocol API secrets” and click the arrow next to it.
- Click “Create.”
- Give your API a nickname.
- Copy the secret value to insert into your plugin settings.
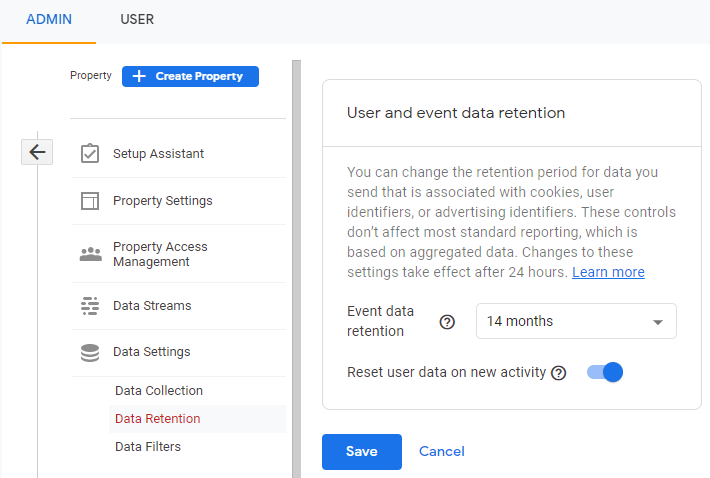
Optional: Adjust Data Retention
Follow the directions below to customize the timeframe that data will be retained for custom reports, etc. (Check your privacy policy to see if you need to adjust any disclosures.)
- Navigate to Google Analytics.
- Select the GA4 Property you want to work with.
- Click Data Settings.
- Click Data Retention.
- Switch your user and event data retention to 14 months.
- Click Save.
That’s it…for now!
If you followed the steps above, you should have dual tracking configured for Universal Analytics and Google Analytics 4. Sit back and watch that data accumulate.
Be sure to keep an eye on WordPress and plugin news so that you’ll be aware of changes to the configuration of any plugins you’re using with Google Analytics. (I’ll be keeping my Digital Wordsmith Dispatch subscribers informed!)
Stay tuned for further details (hopefully!) about how to save your historical Universal Analytics data.
How to See if Your GA4 Property is Receiving Data

Google Analytics will often display a message “No data received from your website yet”–even though you the website is tagged and data is accumulating. Here’s how to check to make sure the GA4 tag is installed and collecting data.
- Clear any caching plugins, Cloudflare, etc.
- Navigate to Google Analytics.
- Choose the new GA4 Property.
- Click Reports.
- If you don’t already see a user count in the section “users in last 30 minutes,” click Realtime.
- If you don’t already see live data in the “Views by Page title and screen name” section, navigate to the website on another device/browser.
Tutorials for Getting Started with GA4
- Getting Started With GA4 from Search Engine Journal
- Google Analytics 4 Glossary: New GA4 Terms to Know from MonsterInsights
- Learn GA4: 17 Top Guides & Educational Resources from Search Engine Journal
- How to Create Google Analytics 4 Custom Reports (Step by Step) from MonsterInsights
More Details on Switching to GA4
- How to Easily Install Google Analytics GA4 by Grayson from iMark Interactive
- Universal Analytics Sunset: What it Means & What to Do Now by Syed Balki from Monster Insights
- The Ultimate Guide for setting up a Google Analytics 4 property by Krista Seiden from Digital Debrief
Thank you for this lesson. It was a huge help!
Hello Gretchen, nice article. If you are interested in a minimal approach to Google Analytics 4, see my article, link in my website url.