

How to Give a Free Download to Your MailerLite Email Subscribers
(This post contains affiliate links. Read my full disclosure.)
Vicki made the final edits to the second email in her welcome series. It was word-perfect. We just had to add it to her MailChimp Automation.
And that’s the day we found out MailChimp now allows only single-email welcome automations.
Vicki and I, along with many others, started looking at options for an email service that is free for small lists but has the option of multi-email welcome automations.
MailerLite saved the day–and the three-email welcome series!
Here’s how to use MailerLite to provide a free download to your email subscribers–whether through a welcome automation or in-post content upgrades.
If you’re coming from MailChimp, you’ll be glad to know that one of the biggest differences between MailChimp and MailerLite is that MailerLite lets you work with each form separately. MailerLite allows you trigger a different workflow, show a different “success” message, send a different confirmation email, or display a different thank you page for each and every form. You’re no longer limited to a single freebie in a single welcome email!
A. Prepare Your File
Does your file include your name, copyright statement, and website address? Is it compressed into a PDF or small ZIP file? Click here for a quick ten-point checklist to make sure your opt-in is ready to give to subscribers.
B. Upload Your File to Dropbox or Google Drive
MailerLite only allows you to upload images to the MailerLite File Manager–you can’t upload a PDF or a zipped media file. You’ll need to upload your freebie to a file sharing service like Dropbox or Google Drive in order to readily share it with your readers through MailerLite.
Be sure to save your link somewhere like Google Keep, Evernote, or Trello so that it’s handy to add to your email automation workflows or opt-in confirmation emails. (If you’re using DropBox, edit the link to change the 0 at the end of your link to a 1 to force download of the link rather than confusing your readers with a Dropbox display.)
C. Decide Where to Add the File Download Button in MailerLite
There are four main options as to where you can add your download button in MailerLite. You’ll need to decide what works best for your readers and complies with any applicable laws.
1. Automation Workflow
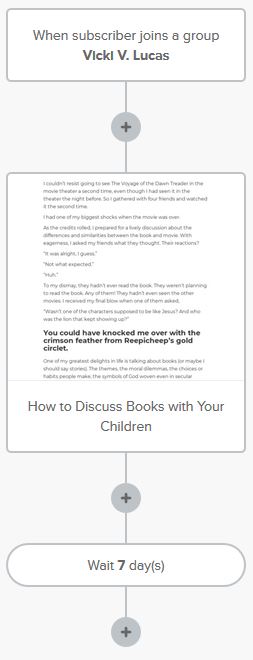
Use an automation to trigger a workflow to send an email immediately when a subscriber joins a group.
The workflow trigger “When subscriber joins a group” will not trigger the email until someone has confirmed their subscription. This option requires subscription to receive the freebie. For multiple content upgrades, this option would work well if you had a separate “list” for each content upgrade. The automation can be set to trigger the email(s) again each time someone subscribes (but it won’t be reactivated more than once per day).
2. Form Custom Success Page
Choose to redirect subscribers to the URL of your free download (on Dropbox or Google Drive) rather than to the default page that says “Thank you! You have successfully joined our subscriber list.”
This option would work well for multiple in-post content upgrades, as you’d create one form per content upgrade. The “success” message/URL is shown whether or not they have previously confirmed a subscription, and is shown on every form submission. This option does not require subscription confirmation to receive the freebie.
3. Form Opt-In Confirmation Email
You can add a download button to the email that asks subscribers to confirm their email address. However, adding the freebie to the confirmation email may lessen opt-ins as you’re giving them two actions to choose from–download the freebie or confirm their email address–and they may not complete both.
This option requires double opt-in be turned on. But it will only be seen the first time someone subscribes–when they receive the email asking them to confirm. This option requires subscription to receive the freebie.
4. Form Confirmation Thank You Page
You can edit the default text of “Welcome! You are now subscribed to our newsletter.” confirmation thank you page to include a button with the download link.
This option, too, requires double opt-in be turned on. And it will only be seen the first time someone subscribes and clicks to confirm. This option requires subscription to receive the freebie.
D. Add the Download Button to Your Location(s) of Choice
1. Automation Workflow
Option 1 uses an automation trigger to send an email immediately when a subscriber joins a group.
a. Go to Automations in MailerLite and click “Create New Workflow” button.
b. Name your workflow.
c. Select the Trigger “When subscriber joins a group” and choose your group.
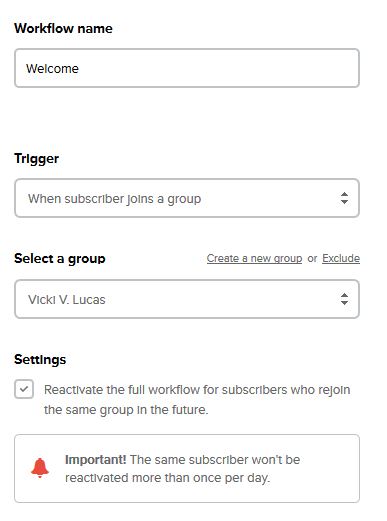
d. If desired, you may check the box to “Reactivate the full workflow for subscribers who rejoin the same group in the future.” This will enable your subscribers to receive the automation freebie email(s) again and again (but not more than once per day).
e. Click Save.
f. Click the plus icon and add the “Email” step to your workflow.
g. Specify your subject, etc. then click “Design email” button.
h. Choose a template or start from scratch. (I prefer the new drag and drop editor.)
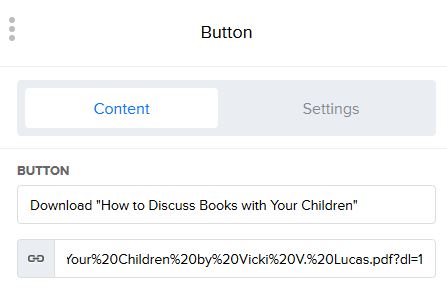
i. Drag and drop a Button block into your email then click the button to edit its contents.
j. Paste your saved link (from step B above) into the “Enter URL” field and click “Save” button.
k. Click “Done Editing” when you’re done composing your email.
l. Click the plus sign to add delays, conditions, and other emails to your workflow.
m. Toggle your workflow to “ON” in the top right corner to start sending your email!
Remember: The workflow trigger “When subscriber joins a group” will not trigger the email until someone has confirmed their subscription. Option 1 works well for a welcome email series. Option 1 can also be used for multiple in-post content upgrades if you had a separate “list” for each content upgrade.
2. Form Custom Success Page
Option 2 immediately redirects subscribers to the URL of the free download (on Dropbox or Google Drive) rather than to do the default “success” page.
a. Go to Forms in MailerLite and click “Edit” on the form of your choice.
b. Click on “Settings.”
c. Check “Custom success page” to send subscribers to a URL instead of the standard success message.
d. Paste your saved URL (from step B above) into the “Redirect URL” field.

e. Click “Next” button.
Remember: This option redirects subscribers to the URL of your free download and is shown on every submission of the subscription form. Option 2 provides the most instant gratification and is the most reliable for always providing the freebie–but it will give the freebie to unconfirmed new subscribers, as well.
3. Form Opt-In Confirmation Email
Option 3 adds a download button to the email asking subscribers to confirm their subscription.
a. Go to Forms in MailerLite and click on the name of the form.
b. Click on “Confirmation Email.”
c. Click “Edit” button for the email itself.
d. Drag and drop a Button block into your email then click the button to edit its contents.
e. Paste your saved link (from step B above) into the “Enter URL” field and click “Save” button.
f. Click “Next” button.
Remember: This will only be seen the first time someone subscribes–when they receive the email asking them to confirm. This option may also lessen subscription confirmations as you’re giving them two actions to choose from–download the freebie or confirm email address. Option 3 works well if you’re only offering one freebie to first-time subscribers.
4. Form Confirmation Thank You Page
Option 4 edits the default text of the confirmation thank you page to include a download button.
a. Go to Forms in MailerLite and click on the name of the form.
b. Click on “Confirmation Thank You page.”
c. Make sure you do not have a URL for “Your own landing page” specified below.
d. Click “Edit” button.
e. Drag and drop a Button block into your email then click the button to edit its contents.
f. Paste your saved link (from step B above) into the “Enter URL” field and click “Save” button.
g. Click “Next” button.
h. Click “Save” button.
Remember: The Confirmation Thank You Page will only be seen the first time someone subscribes and clicks to confirm. Option 4 works well if you’re only offering one freebie to first-time subscribers.
Still using MailChimp and only need to send out one email with a free download?
Thanks to Vicki V. Lucas for permission to use the screenshots from her MailerLite account!
Thank you for the great tutorial as I was struggling until I found your extremely helpful.
I have to say a very big ‘Thank you’ for this. I was struggling until I found your extremely helpful and easy to follow help. I’ve added it to my favourites! I’m sure to need it again.
Great tutorial. I love your line by line instructions. It could be that things have changed on the Mailerlite interface in the past couple of years, but for your #4 option I don’t see “confirmation thank you page.” Instead it says “double opt in thank you page” which means it has to be a double opt-in. I’m new to Mailerlite (just testing it out before I change from Mailchimp) so still trying to get my opt-in to work. Thank you again for this page.
Where have you been all my blogging life??? I am so happy to have discovered you via a Google search on the best way to send our freebies. Love your site and will definitely be checking back often.
Hi Gretchen,
Thank you for the great tutorial re Re free-download-mailerlite-email-subscribers
I have gone over it several times, following step by step but my in mailerlite still says invalid format.
Not sure if this is the proper format to reach out to you on.
Would appreciate any additional help anyone could offer.
Will provide the link info if needed.
On what step are you seeing the invalid format error, Verna?